Git Conflict Sloving
Thursday, June 25, 2015 5:15 AMEverybody's greatest fear when working with Git or any other Version Control System is to mess it up. But let me tell you that there is almost no way to mess up a project when you follow the suggested Workflow when starting to collaborate on code. But still, for a lot of developers there is still one big fear left – Merge-Conflicts
You cannot break things
One thing you should always remember is that you cannot break things because of merging. Git enables you to revert merges, undo things and start from scratch. Git also takes care of most things during merging and even when it comes to conflicts in worst case you'll just handicap yourself and it won't bring your complete team to halt.
When do merge conflicts happen
Merging is the process when integrating the codebase of one branch into the one you are curently working with. Doing this you grab the code of another branch an combine it with your current working files.
The good thing about Git is, that it is pretty smart and figures out how to integrate new changes by itself without your help. But there are some cases where you need to tell Git what to do. These situations will most likely happen when two persons worked on the same file on different branches. Even then Git will be able to figure out how to integrate changes. But if two persons change the same lines in the same file on different branches or if one person decides to deletes parts of a file while the other started making changes on it at the same time Git won't know how to solve this situations alone and therefore it will mark this file as conflicted in order to let you know that it is up to you to solve them.
Dealing with Merge Conflicts
When a merge conflict happens the first thing you probably should do is to stay cool an figure out what just happend and why. Did a merge conflict happen because of a deleted or modified file or did you both add a file with the same name?
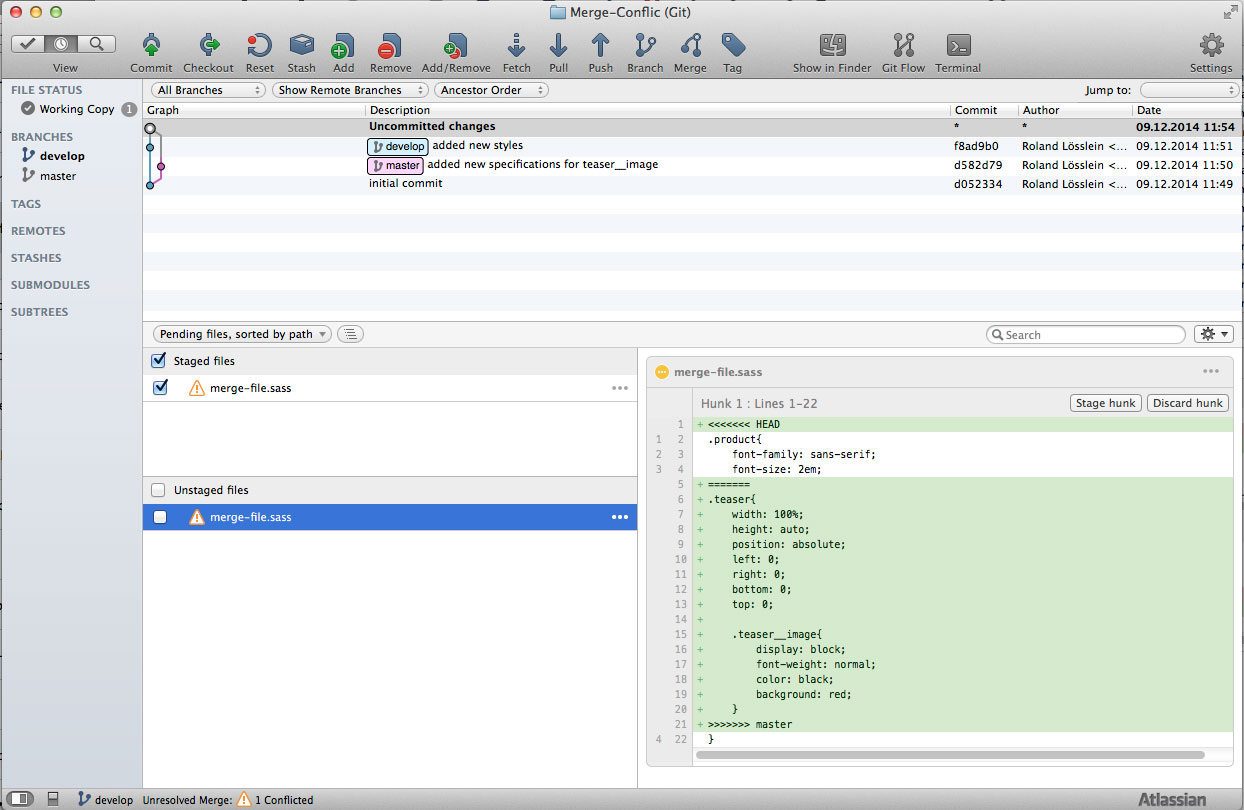
Sourcetree will help you to identify conflicted files.

Conflict Markup
Let's take a closer look on how a conflict will reflect in markup of your file. Git will wrap conflicted areas with a <<<<<<< HEAD marker in the beginning and a >>>>>>> [other/branch/name] marker at the end.
<<<<<<< HEAD font-family: sans-serif;
position: relative;
develop
Text after the first marker shows content of your current working file. Lines after the ======= are the changes coming from the other branch. So ======= separates the changes that will cause the conflict.
Resolve Conflicts
When a conflict happens, your job is to clean it up. The example above is pretty simple and you might be able to solve the conflict using a text editor. But sometimes there are pretty complex conflicts happening to a file and the conflict markup becomes pretty messy. There are plenty of tools out there, that will help you resolve these conflicts visually and that will work well together with Sourcetree. One tool that will help you to resolve conflicts is P4Merge. The only thing you need to do to get it working correctly is to download and install P4Merge and add it as the preferred external Diff and Merge Tool in the preferences of Sourcetree. Therefore navigate to Diff in Sourcetree's preferences and select P4Merge in the dropdown.
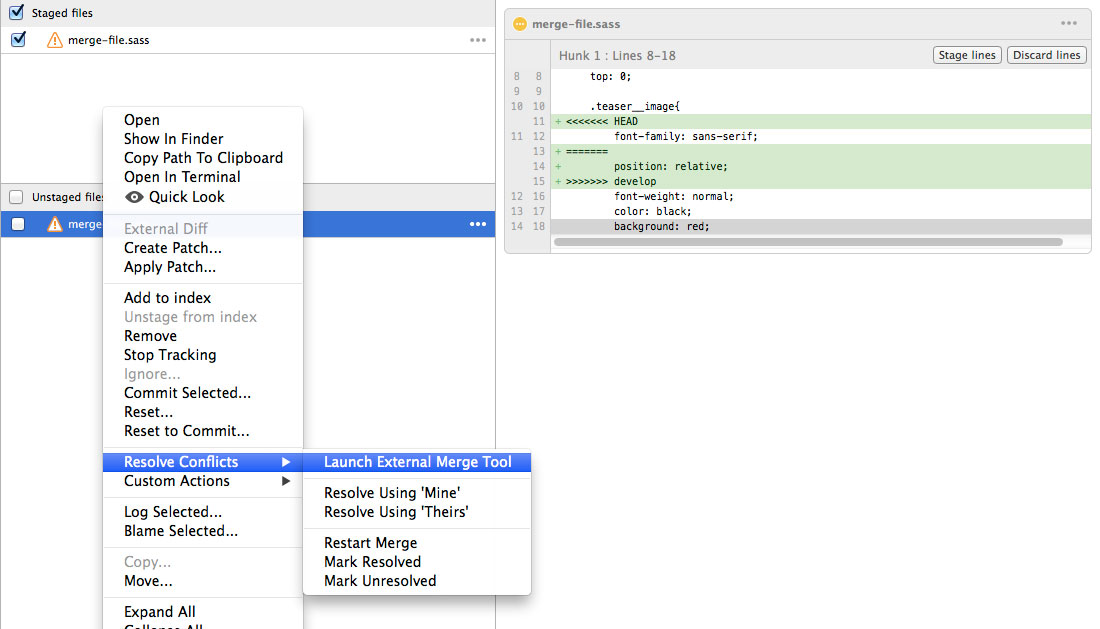
Once a file is marked as conflicted you'll will notice this by the Icon that Sourcetree adds to the file in the list of changed files. To fire up an external merge tool right-click on the conflicted file, goto Resolve Confilicts and choose Launch External Merge Tool.

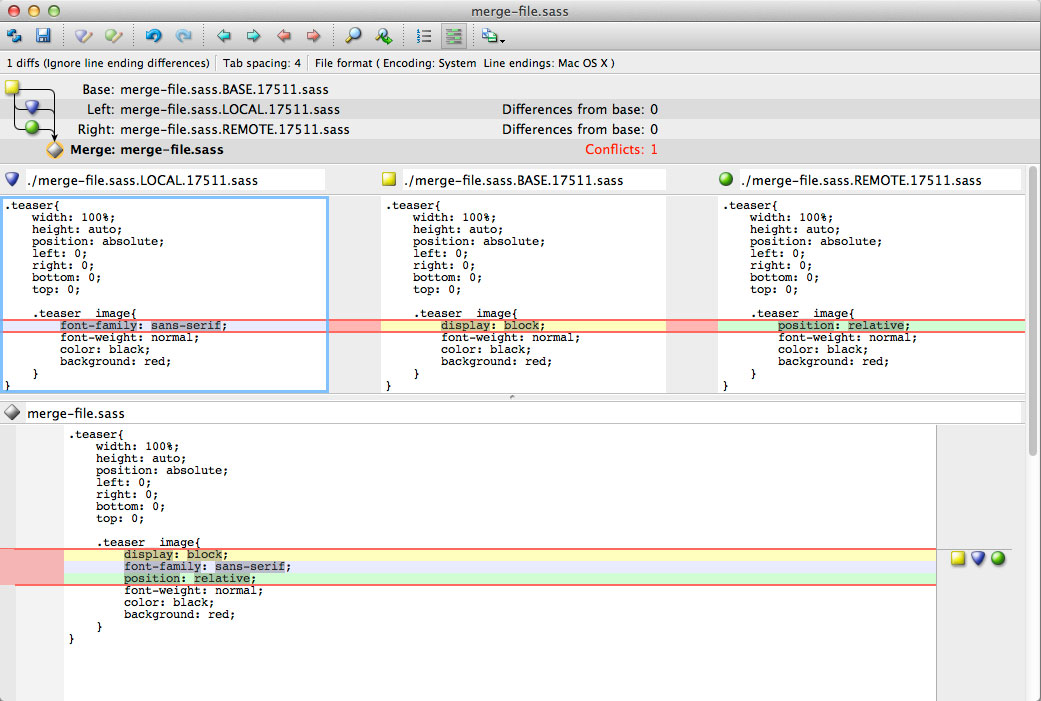
P4Merge will open up the conflicted file in a new window. There you'll see three columns first. The left one reflects the content of your local working file, the right column shows content of the remote file you've tried to integrate. In the middle you'll find the common base of the two conflicted files (left and right).

The view underneath the three columns of referenced files will give you the result of the merge. Usually P4Merge tries to merge all three versions – local, remote and base – of your file, but you can decide what should go into the final result and what should be ignored by toggle the Icon-Buttons to the right of the merged lines. The yellow square is the common base, the purple triangle stands for your local version and the green circle reflects the changes that will be included from the remote file. You can click (single toggle) or hold Shift and click (multiple selection) to control which changes make it to the final result. You can do this with every conflict in this file one by another. If you need to do custom changes to the final result feel free to use the editor function of the merged result view and write down your own changes.
After you've finished resolving the conflicted file make sure to save and quit the merge tool. Only then Sourcetree is able to recognize that a conflict was resolved an therefore changes the state of the file from conflicted to staged.
If your merge was successful and everything is okay, you can delete this file.
Undo a Merge
If you've resolved the conflict of a file and didn't commit yet but want to start the resolving process all over, you should first lookout for a .orig file with the same basename as the conflicted one. This is a backup that was created. Copy the content of the .orig file to your previously conflicted file and right click it in Sourcetree, move to Resolve Conflicts and click on Mark Unresolved. From there you can start the process from scratch.
It happens that you realize that your merge was wrong after you've already committed the merged file. That's nothing to be worried about. You can easily roll back to the point before you've merged by reseting to the commit before you've started to integrate the other branch. In Sourcetree try to find the last commit of your current branch in the branch history before merging, right click on that commit and choose reset your_branch to this commit. Choose Hard in the next dialog as the reset mode and click OK.